Step Three: SQUARE FOOT GARDENING
If starting a garden seems like more work than it’s worth, read on because square foot gardening will change your life. And if it doesn’t change your life, it will make gardening much easier and more fun.
I first learned about Square Foot Gardening from a PBS television series in the 70’s hosted by Mel Bartholomew. I picked up Mel’s Book years ago but only recently put his techniques to practice.
“Square foot gardening will save you at least 80 percent of the space, time, and money normally needed to garden, and at the same time will produce a better and more continuous harvest with less work.”
Why it works so well:
- Garden design is simple…just fill in the squares.
- Weeds do not overtake a square foot garden.
- Soil is not compacted by foot traffic…plants flourish.
- More plants in less space.
- Most important: You will actually enjoy and succeed at vegetable gardening.
Those of us who love gardening can’t wait for Spring. We have high hopes of planting a variety of vegetables, perhaps some flowers, and maybe even a few odd-looking vegetables just to see how they turn out (last year it was purple carrots). I’ve always taught my kids that gardening is an adventure. We may be doing battle with some pests, or encounter a few setbacks, but we will be rewarded as well. The square foot gardening method eliminates the drudgery of rototilling and grading each year lets get right into planting.

The three basics steps of square foot gardening are:
- Build a box
- Fill with planting mix
- Make a grid
I covered the box-building in my earlier post. Today I want to touch on the planting mix and dive into the grid and planting techniques. While I have been purchasing bags of “garden soil” buying bulk garden mix, Mel Bartholomew suggests the following mixture:
Mel’s Mix
- 1/3 blended compost
- 1/3 peat moss
- 1/3 coarse vermiculite
I’ll probably give it a try next year in one box and post the results.

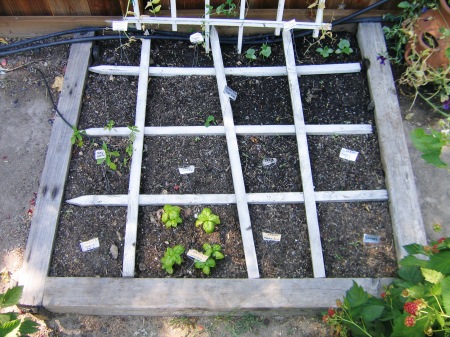
The magic is in the grid. Start with a 4 foot by 4 foot raised bed. divide the box into 12 inch squares. You must do this to make it work. In the box above, I painted a few old wooden stakes and cut them to size.
Now you just plant according the the specs on the seed packet EXCEPT that you plant in a square foot rather that a row. For example, you can fit 4 lettuce heads per square, 9 bush beans per square, 1 broccoli per square, 2 cucumbers per square, 16 carrots per square, 1 eggplant per square, 1 muskmelon per square, 16 onions per square. Are you getting the picture? You can pack a lot of plants in that small space.
In the garden box above, we planted:
4 watermelons (4 squares against trellis)
Scabiosa (1 square)
Zinnias (2 squares)
Chocolate Flower (1 square)
16 lettuce (2 varieties, 4 squares)
Pansies (1 square)
Aster (1 square)
18 spinach (2 squares)
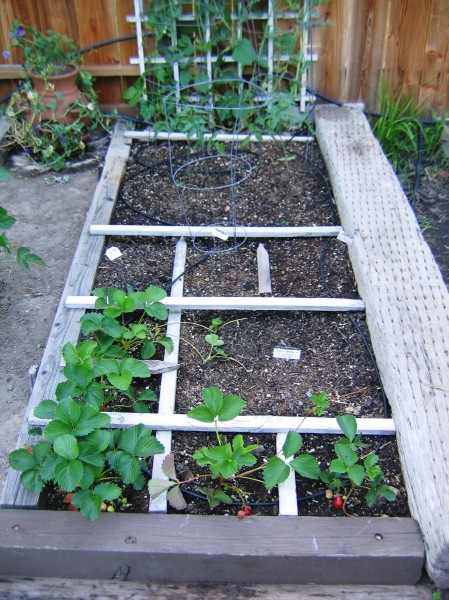
In this box…
We planted:
6 cucumbers (4 Straight Eight, 2 Japanese Soyu Burpless)
2 vining squash (Trombetti di Albonga)
2 acorn squash (Table King)
8 Thai Basil
4 Italian Basil
4 Purple Basil
4 Savory
32 Carrots (Tondi di Parigi)
32 Carrots (French Baby)
Since larger plants require more than a single square , cut your grid markers into one and two-foot sections so that you can improvise like this.
Back Row: We’ve got sugar snap peas on the fence. I just planted pole beans in there (Scarlet Emperor) to take over when it gets too hot for the peas.
Next Row up: Tomatoes require 2 square feet, so I’ve planted two of them in that 3×2 area.
Next Row: Eggplant (Rosa Bianca & Black Beauty) requires 1 square foot, so we planted one on either side of the bush beans (Tavera).
Next Row: 2 strawberries (everbearing) and 1 zucchini (Clarinette Lebanese). This squash actually requires 3ftx3ft, so I’m pushing it with the 2ftx2ft space. We’ll see how it goes.
Front Row: 3 everbearing strawberries
For more information, planting guides, trellis ideas and more, pick up Mel’s Book. If you have any square foot gardening tips, tricks and success, please share them.
Tags: acorn squash, Aster, Black Beauty, carrots, chocolate flower, Clarinette Lebanese, compost, cucumbers, drip irrigation, everbearing, fertilize, French Baby, french baby carrots, gardening tips, grid, head lettuce, Italian Basil, Japanese Soyu Burpless, leaf lettuce, lettuce, Mel Bartholomew, Mel's Mix, muskmelon, Our Garden, pansies, pansy, peat moss, pincusion flower, planning, plant, planter box, planting, pole beans, Purple Basil, Rosa Bianca, Savory, scabiosa, Scarlet Emperor, seed packet, soil, spinach, square foot gardening, Straight Eight, strawberries, Table King, thai basil, tonda di parigi, Tondi di Parigi, Trombetti di Albonga, vegetable, vermiculite, watermellon, watermelon, Weeds, zinnia, zinnias, zucchini


April 23, 2009 at 4:22 pm |
Awesome tips! I just noticed the smiley face at the bottom of your page, where people usually put copy right information. 🙂
May 12, 2009 at 6:10 am |
Really like the grid idea. I haven[‘t tried that yet. Thanks for the interesting photos.
December 28, 2009 at 7:12 pm |
You MUST try Mel’s Mix. It is what minimizes the weeds and the watering. Start looking now for coarse vermiculite. It may be hard to find in your area. You want to buy a huge bag to make it economical. I buy it in 4′ tall bags. A nursery supply center may get it in for you.
This year when I cleaned my SFG I had to laugh. A slight pull on the tomato stem pulled up all 4′ of the roots. They had been happy to go sideways in the garden rather than penetrating the soil beneath Mel’s Mix. Bet you couldn’t just pull up your tomato roots that way! By the way, that’s how easy the very few weeds come out also.
April 5, 2011 at 2:41 pm |
[…] courtesy Smith Family Garden, AFP and Mayang’s […]