If you haven’t made your own compost, you are missing out on a great project for the whole family. It will save you money, help the environment, and make you feel good when you scoop out that “black gold” and add it to your garden. Contrary to what some folks think, a compost pile should not be smelly. It will generally not attract animals either if you follow these five steps:
STEP ONE – Choose a Container
Composting is easy when you have a convenient place to keep your debris. The type of container you choose will depend on the space you have available and how addicted you get to composting. Be careful, it may take over your life.
Small Spaces. Even a small condo balcony will accommodate a composter. You can purchase small compost bins or make your own.

Backyard. Make a receptacle for composting out of almost anything: chicken wire, wood pallets, fencing, etc. We made ours by stacking concrete blocks and brick.

Plastic tumblers have gotten high praise for cleanliness and ease of use. We recommend planning for two compost piles, if you have the space. Once your main compost pile has decomposed and has begun the cooling down process, you’ll need a place for your fresh kitchen scraps and yard waste.
Kitchen. Keep a compost bucket handy. You won’t want to hike out to the compost pile every time you peel a cucumber, so make it easy on yourself.

STEP TWO – Mix the colors (Green and Brown)
To keep the heat up in your compost pile, you’ll need to add a mixture of green and brown debris. When adding kitchen scraps, dig a little hole in the pile for the scraps and cover them up. This will reduce the chance of animal visitation. The Cornell University composting website recommends a Carbon-to-Nitrogen ratio of 30 to 1. Too much Nitrogen accelerates decomposition but depletes oxygen. This can result in a smelly anaerobic condition. Try different ratios to see what works for you and remember to aerate the pile regularly to infuse it with fresh oxygen. This will keep it smelling as fresh as…well…compost. It’s not a bad idea to throw in a couple shovels of soil from your garden. The microbes in your soil will get right to work.
Greens. Nitrogen is required by the beneficial soil bacteria responsible for most of the decomposition and heat generation in compost. Bacteria are 50% protein. Nitrogen is a critical component of protein. The Greens include: grass clippings, fresh soft prunings, weeds, spent flowers, green leaves, seaweed, old veggies and peelings.
Browns. Carbon is a basic building block and a source of energy to microbes living in your compost pile. About 50% of microbial cells is carbon. The Browns include: dried leaves, newspaper (run it through a paper shredder), cotton clothing, sawdust, dried grass/weeds, straw, hay, paper grocery bags, cardboard, coffee grounds. Starbucks gives the grounds away. They are a great source of phosphorus, potassium, magnesium and copper.
Don’t Add: Dog/cat/human feces (herbivore feces are ok), oil (lettuce with salad oil for example), fat, grease, bones, dairy products, and diseased plants. These items don’t break down well, may add disease, and attract animals. Eucalyptus leaves and invasive weeds can be a problem if your compost doesn’t get hot enough. Eucalyptus can inhibit microbial activity and takes a lot longer to break down. We usually rake up the ‘Euc leaves, toss them in the recycle garbage can, and keep them out of our compost bins. Bermuda grass is thick in our area and lives on in a compost pile that is not kept hot.
TIP: A leaf shredder will pulverize the material, increase the surface area, and speed decomposition. Most fit right over a standard garbage can.
STEP THREE – Just add Water
Water is needed by the microorganisms that are working away on your compost pile. The material should be kept damp, not soggy.
- At 30% moisture, decomposition stops.
- At 35% – 40% moisture, decomposition is slow.
- 55% – 60% moisture is the upper limit and is good to start with. The heat generated will dry out the pile as it decomposes.
Too much information? You don’t have the composting bug yet…
STEP FOUR – Mix it up
This is an aerobic process. In other words, it requires oxygen. The pile needs to be turned in order to get the oxygen down into the material. We mix ours every week or so. Frequent turning of material will increase the rate of decomposition. This will also keep the pile from smelling. Sour smells generally indicate too much water and too little oxygen. Turning the compost also allows you to monitor the moisture level.
Mixing Tools:
Aerator – The twisting motion is easier on your back.

Pitchfork – You can move a lot of material quickly.

Spading Fork – Heavier than a pitchfork but works in a pinch.

Flat shovel – Good for removing the finished product.

STEP FIVE – Keep it hot
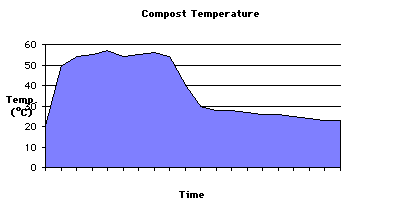
If you get crazy into composting you may want to monitor the temperature and closely manage the rate of decomposition. Maintain the temperature between 105° -149° Fahrenheit until the material is homogeneous.
Did you know that there are three phases of compost decomposition? Read on if you are starting to get excited about composting.
The Mesophillic phase occurs in the beginning for a few days as the temperature rises to about 104° Fahrenheit.
The Thermophillic phase may last up to a few months, but is generally much shorter for backyard compost piles. Temperatures range from 105° to 149° Fahrenheit. Don’t let the temp rise above 149° as it will kill beneficial microbes and reduce the rate of decomposition.
During the Cooling and Maturation phase, the material will cool and decomposition will cease. This may last up to several months depending on how aggressively you manage the composting process.

Managing your Compost Pile
A compost thermometer is a great tool for gauging the activity, but if you don’t have one, use your nose… 
Smells Fresh – Keep doing what you’re doing.
Rotten Eggs – The oxygen has been depleted and that sour smell indicates that you have an anaerobic situation on your hands. Add some dry material and turn everything well.
Ammonia – The Greens outnumber the Browns. Add dry brown material and some soil from your garden, mix well and add water, if needed.
No smell, no heat, no change to the material – If it seems like nothing is happening you probably need to add greens and water. Then check the temperature in a day or so to confirm that you are back on track.
![]()
Got Ants? This generally indicates that the pile is too dry and probably too cold. Add water so that the pile is damp. Add greens if you still require more decomposition.
Screening – When your compost is ready, you’ll probably need to screen it to filter out rocks, sticks, corn cobs, etc. We made a simple screen out of hardware cloth and scrap wood. It fits over a garbage can.
So, that’s probably more information than you want to know about compost. If I missed anything, please post a comment. Got a compost tip? Please share it with us!


